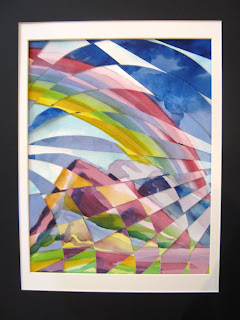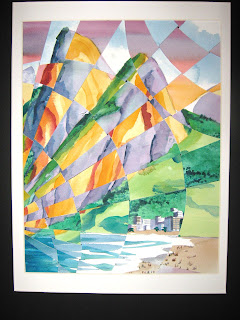


We had a demo last year in my watercolor class that basically rocked my painting world. I always like to develop new watercolor techniques that are easy and turn out consistently good results. Weaving two paintings together is about as easy as it gets.
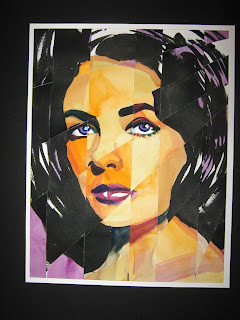
First you paint two separate paintings of the same subject. Landscapes probably turn out the best. Portraits are a bit difficult and, although Liz Taylor is recognizable, I have to deviate from her true skin tone in order to get any variance in the paintings. In the above I used orange, so it might come out just Liz with splotches of orange around the mouth. I don't think too many people at the office who saw it even realized it was a woven painting. I could have gone WAY off the natural skin tone, but then she wouldn't look like a person. Or green. Or blue. Skin tone on the first painting and orange and gold on the second just says bad skin.
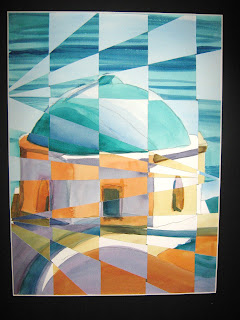
OK, so let's say you are going to pick a landscape, a seascape, an unusually shaped structure, aspen trees, or an animal. You do two exact pictures by tracing. I personally go one light, one significantly darker; one pastel, and one more primary. Opposite colors on the color wheel work great. I tend to stay away from browns and a whole lot of realism for the colors. However you do your painting, it will come off abstract in the end due to the weaving. I would say the less complicated your subject, the more recognizable it is. The building in Santorini above is a good, basic building with the shadows on both paintings in the same place. Most areas can be lined up on a simple subject. If you do mountains with varying shaded areas, the tops of the mountains can be lined up, but not the shading. Some people don't mind things being out of alignment, but it just depends on how recognizable you'd like your subject to be.
Once I have done the paintings I start on the cutting. This is also arbitrary. The most common is one vertical and one horizontal. I think that's a bit boring, and tend to go with circular lines on one and diagonal lines on the other. Even if you like straight lines, diagonal is far more interesting. Curves add movement to the picture making it almost swirly. Curved lines can be drawn with a big bowl. I draw the lines on the back of the picture, and if there are details on one painting I want to retain in the finished painting (e.g. a cool cloud formation or in Liz's case the eyes in one were better than the other) I draw the lines on the front of the painting around that area and build the cuts around that one strip.
Finally you cut it based on my little video, and just weave the strips together ony by one. It might take a good while to get everything to line up. I sometimes start over. The best way to avoid getting things out of order is to number the back of the strips.
What comes out in the final product is a big surprise, especially to me! I have NO idea what the weaving will look like. But so far, I've been more pleased with the woven painting than I was with the original works. I guess it's because it really is an accident and it's SO easy to make it all come together.


